Online photo editor
Adjust and export in your browser
Adjust light and color, rotate, crop, apply effects and export one or multiple images directly in your browser.
You can also drag and drop one or multiple images in this area.•Accepted inputs: JPEG, PNG, WEBP, GIF and BMP when the browser can decode them. Export is available as JPEG and PNG, and as WEBP when the browser supports that encoding.
Image editing runs in the browser. The site can still make technical requests and, subject to your consent, load measurement or advertising. Read the Privacy Policy.
Edit a photo in 3 steps
1. Open your images
Choose one or more compatible files or use the demo.
2. Choose a tool
Use adjustments, rotation, crop, filters, HSL, noise, grain or vignette and review the preview.
3. Export a new copy
Choose JPEG or PNG — or WEBP when the browser supports it — and optional quality and resize settings.
Current tool interface
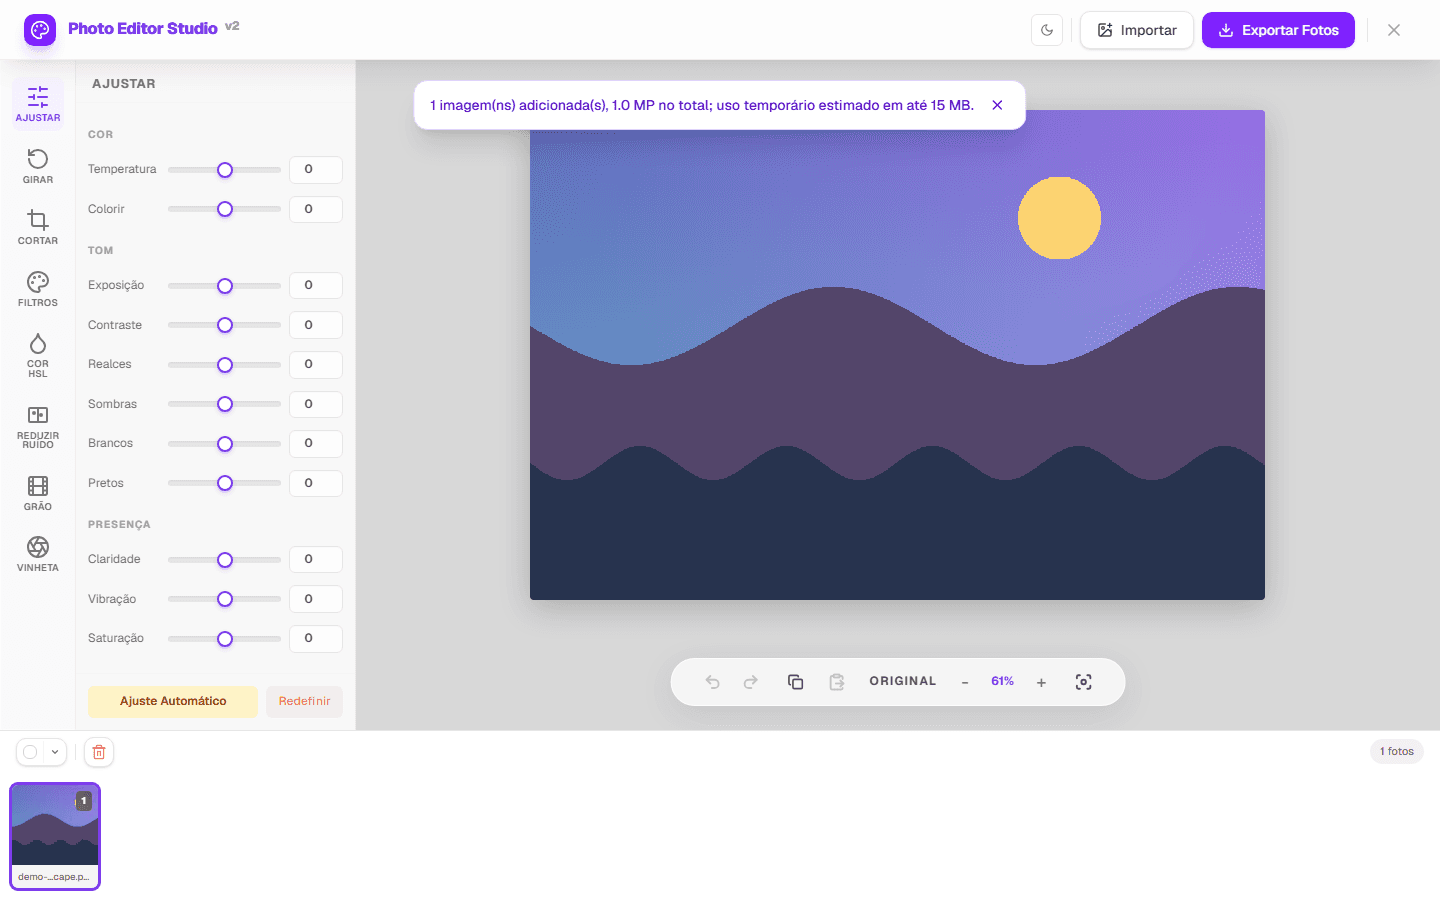
Tools available in the Studio
Composition
Rotation, mirroring and crop with presets or entered dimensions.
Light and color
Global adjustments, filters and HSL color ranges with original comparison.
Finishing and batch
Noise reduction, grain, vignette, multi-photo selection and ZIP export.
Choose a workflow for the task
Quick correction
Adjust exposure, contrast, temperature and saturation and compare before saving.
Web preparation
Crop, resize without upscaling and choose the right output format.
Image series
Load multiple photos, apply a shared base and review exceptions.
Where your image is processed
The editing itself happens in your browser. When you open a file, the browser decodes it into pixels held in the page's memory, and every adjustment is a computation performed on those pixels by your own device's processor. Export re-encodes the result and hands it to the browser as a download. The image file is not uploaded to an editing server for any of these steps.
That is a statement about image processing, not about the page as a whole. Loading this page is a network request like any other, and the page can make further requests: fonts, scripts, and — subject to the choice you make in the consent banner — measurement or advertising. Those requests carry the information any web request carries. The distinction matters, and the Privacy Policy sets out what is collected and when.
- Decoding, editing and export run on your device, using the browser's Canvas APIs.
- The image file is not sent to an editing server as part of the editing workflow.
- The page itself is served over the network and can load consented measurement or advertising.
- Closing the tab discards the working copy held in the page's memory.
How a photo editor works inside a browser tab
Editing images in a browser was impractical for most of the web's history, and the reasons it became possible are worth knowing — partly because they explain what this kind of tool does well, and partly because they explain its limits honestly.
What made in-browser editing possible
For years, a web page could display an image but could not read it. The pixels belonged to the browser's rendering layer, and page code had no way to reach them. Editing therefore meant uploading a file to a server that had real image libraries, processing it there, and sending back a result.
The canvas element changed that by giving pages a drawing surface whose individual pixels could be read and written. An image drawn onto a canvas can have its pixel data extracted as an array of numbers, modified, and written back. Every adjustment in a browser-based editor is that operation: read the array, compute new values, put the array back.
Two later additions made it practical rather than merely possible. Web workers allowed that computation to run off the thread that keeps the interface responsive, so a heavy operation no longer froze the page. And the File API let a page read a file the user selected without sending it anywhere, which is what turned a technical capability into a privacy property.
What an adjustment actually does to the numbers
A decoded image is an array of numbers: four per pixel, for red, green, blue and alpha, each between 0 and 255. Every tonal and colour adjustment is a function applied across that array. Raising exposure multiplies the values. Adjusting contrast pushes them away from the midpoint. A colour temperature shift raises one channel while lowering another.
Some operations are per-pixel and depend on nothing else — brightness, saturation, and channel adjustments read one pixel and write one pixel. Others are spatial and read a neighbourhood: blurring, sharpening and noise reduction compute each output pixel from the pixels around it, which is why they cost more and why their behaviour changes near the edges of the frame, where part of the neighbourhood does not exist.
This division explains the performance difference between controls. A slider that responds instantly to dragging is almost always doing per-pixel work. One that needs a moment is usually reading neighbourhoods, and the delay grows with both the image size and the size of the neighbourhood it needs.
The order of operations, and why it changes the result
Image adjustments do not commute: applying the same set of operations in a different order produces a different result. Sharpening before noise reduction amplifies the noise and then asks the noise reduction to remove something that has been made more prominent. Sharpening after noise reduction works on an image whose noise has already been reduced. The operations are identical; the outcome is not.
A sequence that avoids the common conflicts is: fix geometry first, since rotation and cropping change what the later steps are acting on; then correct global tone, establishing the range the image occupies; then colour, which is easier to judge once the tones are right; then local and selective work; and finally any output-specific step such as resizing and sharpening for a particular size.
The reason the geometry step comes first is practical rather than theoretical. Tonal decisions made while the frame still includes areas you are about to crop away are decisions made partly about pixels that will not survive, and they frequently need revisiting once the frame is final.
What re-encoding costs, and how to spend it once
JPEG discards information in order to compress, and the information it discards cannot be recovered by decoding. Opening a JPEG, editing it and saving it again means the result is compressed a second time, on top of the losses already present — and the second pass compresses the artefacts of the first as though they were image detail.
One round of this is usually invisible at reasonable quality settings. The damage accumulates when a file is repeatedly opened, edited slightly and re-saved, which is why a series of small corrections applied in separate sessions produces a visibly worse file than the same corrections applied in one.
The practical conclusion is to make all decisions within one editing session and export once, and to keep the original file rather than overwriting it. PNG avoids the issue by compressing without discarding, at the cost of much larger files for photographic content — a reasonable trade for an image that will be edited further, and a poor one for an image being published.
What this kind of editor is not the right tool for
A browser-based editor works on a decoded, 8-bit-per-channel image. That is the right representation for photographs that are already finished captures, and the wrong one for several kinds of work. Raw files from a camera hold more tonal information per channel and expect a conversion step that decides how that extra range is mapped; editing a JPEG that a camera has already converted means working from what that conversion kept.
Compositing is the other boundary. Work built from layers, masks and blend modes — replacing a sky, combining exposures, retouching by cloning between areas — depends on an editing model that holds multiple images and their relationships. A tool that applies operations to a single image can produce a great deal, but it is not that model.
Colour-managed output is the third. Print workflows depend on ICC profiles describing how a specific device reproduces colour, and on soft-proofing that simulates the result before committing. An editor working in the browser's default colour space is appropriate for screen destinations and will not predict what a particular printer does.
Frequently asked questions
Do I need an account?
No. The current editing and export flow does not require registration.
Which formats can the editor open and save?
It attempts JPEG, PNG, WEBP, GIF and BMP when the browser can decode them. Export offers JPEG and PNG, and WEBP when the browser supports that encoding.
Is there a fixed batch limit?
No universal count is promised. Capacity depends on the device, decoded pixels and browser.
Continue with the right workflow
Start with one image
Use the demo or open a file, make a small change and inspect the output before editing a batch.